
Kevin's RV-12 VSB Builder's Log
Tuesday, January 29, 2013
Six month review
Let's review, shall we? In the last six or seven months I built the vertical stabilizer (aka "fin"), the rudder, the horizontal stabilator, the vertical trim tab, and the tail cone. Now in Section 11 of the build plans we're supposed to put all those things together to check fit, control surface travel, and the like. While it would be pretty cool to start assembling the plane (instead of just its parts), it would also take up a lot more space with everything bolted together. Space I'm gonna need to build the wings. So I'm gonna skip that part of Section 11 and come back to it in a couple of years when the wings and fuselage are done. The kits are so well designed and manufactured I'm not worried about the fit or travel. I'm also told it's easier to build the fuze without the tailcone on. The wings, when finished, will get hung from the garage ceiling out of the way until the plane is ready to fly. So what's next besides sending a really fat check to Vans for the wings and lighting kits? Well, there's still plenty to do, so stay tuned.
Saturday, January 19, 2013
Finishing the Tailcone
I borrowed some clecos from Gawdl Muhrt, the Guy at work [who] doesn't let Me use his rivet tool, which gave me enough to put the top skin on the tail cone and secure it.


I counted up all the used leftover rivet mandrels before throwing 'em away as a way to gage progress. When the 12,500 rivets I bought are gone, the plane is done. Completing the tailcone required 1,148 rivets, give or take, and countless times moving clecos around. Still no Popeye arms though, darn it.


 Yep. Just needs a little decoration is all.

There's one more item to work on before I can start riveting the tailcone, and that's the rib for attaching to the forward skin on the vertical stabilizer. The rib has eight nut plates that need to be dimpled and riveted on. The tiny #3 rivets were actually pretty easy to squeeze single-handed, as you can see:

Just push the handle down 16 times (twice per nutplate) and it's done.

The rib is cleco'd and riveted on top of the top skin near the back. It'll be used to attach the forward skin on the V-stab.
With that out of the way it was finally time to start riveting the rest of the tailcone skins together. It took a while using the manual pop-rivet gun. I tried to borrow a pneumatic pop-rivet gun from the guy at work to speed things up but Gawdl kept muttering something about me breaking it before he had a chance to do his project. He probably heard about me breaking Mike's tap handle. I dunno. It's like he doesn't trust me or something. So I used the manual one that came with all the other tools Mr. B loaned me. Rivet after rivet, row after row, hand muscles getting sorer and sorer until... I broke it. The wire spring that spreads the handles apart sheared from metal fatigue. Don't worry Mr. B; I picked up a new pop-rivet tool at Home Despot:

Which works very well. It really doesn't take that much longer compared to a pneumatic one. Three good squeezes and pop! The rivet is set. Actually takes me longer to get the rivet set up -- sometimes it just doesn't want to slip into the hole right away and needs a little poking, prodding and persuading with an awl. Here I'm finishing up the last few rivets:

Some of the rivets in the area where the front of the V-stab attaches are a bit hard to get to. You can see here about 1/4 inch gap between the rivet mandrel and the forward V-stab attach bracket -- not enough room to get the barrel of the rivet tool over the mandrel. So I did like before and used the little wedges we fabricated way back in step 1 to pop the mandrel off at an angle.

I counted up all the used leftover rivet mandrels before throwing 'em away as a way to gage progress. When the 12,500 rivets I bought are gone, the plane is done. Completing the tailcone required 1,148 rivets, give or take, and countless times moving clecos around. Still no Popeye arms though, darn it.


And that wraps up Section 10. I moved the tailcone out of the way to organize the shop area in anticipation of starting on the wings later this year (after tax returns are done - per the CFO's insistence. I think she's trying to motivate me to not wait until April 14th as usual). I think it looks good in the spot formally occupied by the Christmas tree that I finally took down last week. Reminds me of the newfangled artificial tree at the tree lot in A Charlie Brown Christmas that sounded like an old oil drum.
 Yep. Just needs a little decoration is all.
Tuesday, January 8, 2013
Upper Tailcone Skins
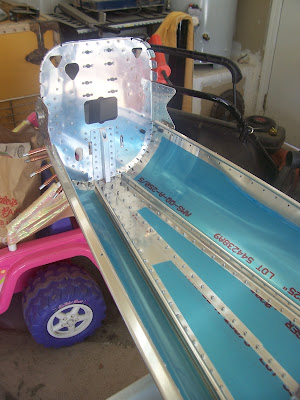
Once I got the trim motor wiring, static port tubing, and pull strings for the stabilator control cables in I added on the upper left side skin...

... and then the upper right side skin:

And I am out of clecos. See how spaced apart they are? Not good. Fortunately I was able to borrow more from Gawdl Muhrt, another guy that I work with, who picked up a bunch at the same time as me (at half-price due to factory blemishes!) to restore an old Airstream trailer.
In the next step we cut the rudder cable(s) bushing bracket(s) with the bandsaw

 and debur with the scotchbrite wheel. The brackets get riveted inside the upper skins at the very back near the bulkhead. Snap-in bushing-grommets are inserted and strings are run from the back to the front to pull the rudder cables through later. Now it's time to start riveting the skins together. If only Gawdl would let me use his pneumatic pop-rivet gun...

... and then the upper right side skin:

And I am out of clecos. See how spaced apart they are? Not good. Fortunately I was able to borrow more from Gawdl Muhrt, another guy that I work with, who picked up a bunch at the same time as me (at half-price due to factory blemishes!) to restore an old Airstream trailer.
In the next step we cut the rudder cable(s) bushing bracket(s) with the bandsaw


Monday, January 7, 2013
Wiring and Things
There's a few items to take care of before the upper left and right skins are attached. As noted previously, the wiring harness for the AST trim tab motor needs to be routed down the left side of the tailcone. In addition to trimming the airplane, the AST motor will also used by the autopilot to control pitch attitude. Pretty cool, eh? None of the Cessnas I've ever flown had any of that fancy schmancy autopilot stuff. Since one end of the harness already has a small plug for the wires (and since the plug does not fit through the grommet on the rear bulkhead), the decision is made for you which end is which: You pull the wire forward from behind the rear bulkhead, leaving six inches (and the plug) behind the bulkhead. The wire harness is routed down the left side J channel and secured with zip ties. The forward zip ties are left loose until the static tubes are installed.

For the two static ports, first we rivet in the right side static port, which is just like a regular pop-rivet but with a big head on it.

And then the left side. After the static ports are pop-riveted on, the mandrels inside the static port-rivets are driven out with a small punch and hammer. I followed other builders' advice and took a block of wood, drilled a hole in it and had my assistant, the lovely but unnamed CFO, hold it against the inside skin so I could knock the leftover mandrel piece out the other side without denting the skin. Both punches I have were too big to fit in the hole so I just used an old mandrel and it worked fine.

After the mandrels are driven out I installed the static port tubing. The clear tubing appears to be the same stuff you'd find in a fish aquarium.

Tubing for both sides is routed up the large frame hoop and connected in the middle with a T fitting. It's a bit different from earlier RV-12's, which had the tube from the right side port go all the way over to the left side port. The difference is related to a recent change in the design of the avionics system. The static port(s) tubing, both 1/8-inch the and 1/4-inch, are then secured with zip ties as shown:

Not sure if it's needed, but RTV silicone was used to seal the tubing to the static ports. I had some left over from when I swapped the water pump in my truck a few years ago. The stuff's just as messy now as it was then.

While I was doing this, something about the routing of the wiring harness at the rear bulkhead kept nagging at me. I knew it would be difficult to inspect if the edge of the J-channel ever chafed it's way through the harness and shorted out the wiring. And since I had already cinched the zip ties, it would have been a fair amount of work to put protective shrink-wrap over that section, which I didn't have anyway. A delay and a step backwards, if you will.

So I came up with a alternative plan involving three pieces of electrical tape:

First I pulled the harness out of the way and wrapped the small piece of tape over the edge:

And then wrapped two more pieces of electrical tape over the first one like so:

It seemed like a good idea to do it for the front as well:

The problem is that electrical tape just isn't all that sticky and could come off on its own one day. As long as it stays on though, it'll protect the harness from chafing at the ends of the J channel. I'll just add that the sheath on the harness seems to be pretty chafe-resistant and the wires inside it are sheathed in Teflon. Once the harness is connected to whatever it is that it gets connected to, I should be able to add in just enough slack so that it barely touches the fore and aft edge(s) of the J- channel.

For the two static ports, first we rivet in the right side static port, which is just like a regular pop-rivet but with a big head on it.

And then the left side. After the static ports are pop-riveted on, the mandrels inside the static port-rivets are driven out with a small punch and hammer. I followed other builders' advice and took a block of wood, drilled a hole in it and had my assistant, the lovely but unnamed CFO, hold it against the inside skin so I could knock the leftover mandrel piece out the other side without denting the skin. Both punches I have were too big to fit in the hole so I just used an old mandrel and it worked fine.

After the mandrels are driven out I installed the static port tubing. The clear tubing appears to be the same stuff you'd find in a fish aquarium.

Tubing for both sides is routed up the large frame hoop and connected in the middle with a T fitting. It's a bit different from earlier RV-12's, which had the tube from the right side port go all the way over to the left side port. The difference is related to a recent change in the design of the avionics system. The static port(s) tubing, both 1/8-inch the and 1/4-inch, are then secured with zip ties as shown:

Not sure if it's needed, but RTV silicone was used to seal the tubing to the static ports. I had some left over from when I swapped the water pump in my truck a few years ago. The stuff's just as messy now as it was then.


So I came up with a alternative plan involving three pieces of electrical tape:

First I pulled the harness out of the way and wrapped the small piece of tape over the edge:

And then wrapped two more pieces of electrical tape over the first one like so:

It seemed like a good idea to do it for the front as well:

The problem is that electrical tape just isn't all that sticky and could come off on its own one day. As long as it stays on though, it'll protect the harness from chafing at the ends of the J channel. I'll just add that the sheath on the harness seems to be pretty chafe-resistant and the wires inside it are sheathed in Teflon. Once the harness is connected to whatever it is that it gets connected to, I should be able to add in just enough slack so that it barely touches the fore and aft edge(s) of the J- channel.
Tuesday, January 1, 2013
Tailcone Bottom
I knew the day was coming when I would no longer be able to make do with the number of clecos I have available, and so it has. Nevertheless I was able to get a lot done over Christmas and New Years. In fact, this picture makes it look like I have lots of clecos:

And so there is, when all you're doing is fastening the two bottom skins to the frames. Add the next couple of skins, however, and the ranks start to thin:

So I had to spend a lot of time moving clecos around to optimize spacing and persuade each hole to line up. The holes in the skins are precision-punched at the factory and I resolved that I wasn't going to do any match drilling to make the rivets fit if I could help it. Eventually I managed to get each of the three bottom seams laid down nice and flat, except for this one area on the port side:
.JPG)
Don't know why I couldn't get that section of bottom skin to cooperate. Thinking that maybe it had something to do with the way the clecos were advanced in various directions, I removed most of the clecos forward of the middle frame hoop and started over. Employing various strategies (including a full-on cleco assault) I was able to get the skin to lie down (lay down? I think I missed that day in English class) a little better, but not much:

Having done all I could do it was time to start riveting. That took a long time too, since I don't yet have a pneumatic pop-rivet puller to use. Generally started in the center and worked my way out, repositioning the freed-up clecos as I went. Once the bottom rivets were in the "bump" went down some, but I can still just get my fingernail under the edge. The other 300 inches of seams came out nice and tight, but that little bump, well, I guess I'll just live with it. Hopefully whoever looks underneath the plane to scrutinize the rivet lines won't notice. I can just hear it now: "Have a little trouble with the edge-breaker, didja?" A bit blurry, but here's the same area after riveting the four bottom skins together:

And here's the rest of the bottom with rivets:

Now we turn the whole thing over to add the left and right side skins. It's not hard 'cause it doesn't weigh much. Riveting the bottom freed up a lot of clecos, which is good 'cause we're gonna need 'em. Here it is turned right side up:

Before we put on the side skins, however, we fasten in the aft bulkhead that we spent so much time on. That required a lot of manual persuasion and I'm sad to say that there were more than a few scratches added to the skins where the aft bulkhead went in. The aluminum alloy skins have a super-thin layer of pure aluminum that serves to protect the alloy from corrosion, so you want to avoid deep scratches if you can. Here's the aft bulkhead installed on the bottom skins:

The vertical stabilizer and horizontal stabilator will attach here. The skid plate protrudes out the bottom just a little bit, about 1/8 inch or so. Once the bulkhead is fastened in the side skins are cleco'd on:

There's just three more skins left, and once they're on it will be really hard to get back in there. So it was time to peel off the blue protective film while I still had easy access. Other items that are easy to do now (and don't require any clecos) are: Route the wires for the AST servo (electric trim tab), add static-air ports and tubing for the avionics, and run kite strings for fishing the rudder and stabilator control cables through later.
Subscribe to:
Posts (Atom)