Natomas Follies

VSB - very slow build

Sunday, August 26, 2012

Rudder Spar Assembly Part 3

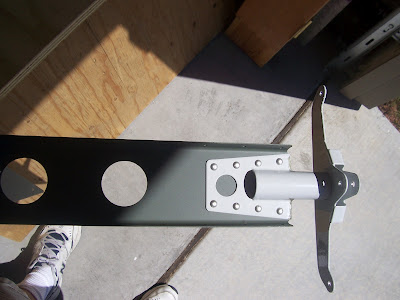
Attached the rudder horn to the spar today...
...and riveted it on.  That was easy.
Shop side of the rivets look good.
And primed over the rivets.

Don't forget to remove the blue film from the inside of the rudder skin:

and cut the little tab thingy off.  Used a hack saw but in retrospect I should have used the metal snips.  What was I thinking?

Deburred all holes and edges then cleco'd the skin onto the rudder skeleton:

Using about 170 pop-rivets I fastened the rudder skin to the ribs and spar and voila!  A finished airplane rudder!  As with the vertical stabilizer, I'm keeping the blue film on for now to protect the alclad from scratches.  A productive weekend!

Next up will be the anti-servo tab for the horizontal stabilator, or simply "stabilator".  The AST is a vertical trim tab that also induces feedback resistance in flight to give a balanced feel at the control stick.  The stabilator is also dual-function in that it combines the functions of the horizontal stabilizer and the elevator in one part.

Saturday, August 25, 2012

Rudder Spar Assembly Part 2

For the next step the bottom rib gets trimmed and attached to the rudder horn, which is where the rudder cables will eventually attach.  I managed to mess that up by using too many of the wedges that are used when a rivet hole is close to a flange or other obstruction.  Once I got the bad ones drilled out, that is the two that are closest to the rudder horn, I used two wedges instead of three on the rivet post, and that worked just fine.  The other six were solid rivets, and they went in just fine too.  Once that was done I masked off the rudder horn, which is powder coated at the factory, and primed the rib with a rattle-can.

After that there were three rudder ribs to add on to the spar which were quick and easy using the pop rivets.

Based on my location in sunny Sacramento I probably don't need to prime the alclad aluminum, but who knows, it may delay any future corrosion problems.  Or trick a future potential buyer that a lot of effort and fancy material was spent priming the internal structures (there wasn't).  Here's a picture of yours truly priming the rudder skeleton (well most of it anyway) the easy way.
Ran out of primer so I'll have to wait until the auto parts store opens in the morning to finish.

Thursday, August 23, 2012

Rudder Spar Assembly Part 1

Next up for assembly is the airplane rudder skeleton.  There's a rivet issue here that gave me some trouble so new RV-12 builders should take heed.  First I'll insert the work photos so it makes sense:
For readers who aren't RV-12 builders, the trapezoid-looking thingys are called spar caps.  They provide a place to mount one of the two rudder hinges and give the rudder spar additional strength.  It's also where the first rib goes.  You match-drill and debur the holes and then rivet them in with 14 rivets each using different sized rivets.

Here's the two halves of the rudder hinge riveted in with four rivets each.   Click on the photos to make 'em bigger if your eyesight, like mine, isn't what it used to be, or you have a small computer monitor.
This is the opposite side of the rudder spar with the rib sticking up.  These are the shop side of the rivets, the part of the rivet that gets squished by the rivet squeezer to create the grip, fixing the pieces together.  Getting the squeeze just right is a bit of an art-- it helps to know what properly-squeezed and improperly-squeezed rivets look like and why it matters.  The builders manual has a whole section on that.  I should probably read it.

And here's another picture of the shop side of the squeezed rivets.  The bottom row of rivets are ones connecting the rudder hinge to the spar and spar caps.  The next row are the ones connecting the rib to the spar and spar caps.  The aluminum hinge is thicker than the aluminum rib, but the plans use the same rivet size for both.

All very straight forward, yes?  Well no, it wasn't.  No way José.  Fortunately other RV-12 builder blogs like Dave G's Schmetterling Aviation give fair warning regarding the rivet lengths in this section of the build.  Basically the warning goes like this:  Owing to the different thicknesses of aluminum, the rivet length is correct for riveting the hinges, but not for riveting the rib.  It won't squeeze right, 'cause that's what rivets do when they're too long for the pieces being fastened.  Proceeding very cautiously on the first rivet I squeezed a little bit from the right side, then a little from the left, then a little from the right... eventually I got a squeezed rivet that will do the job, but will forever be a tiny bit canted.  I could drill it out and do it again, but it's builder's discretion; based on my limited knowledge regarding riveting thin aluminum airplane parts, I'm likely to do more harm than good by possibly enlarging the hole.  Having confirmed Dave G's warning about the rivet lengths, the solution for the next three rivets was easy:  shorten the length of the rivet with a ScotchBrite wheel on the bench grinder.  Once I ground off about a millimeter or so, then cautiously squeezing from the left, then the right, then a little more from the left, and so on, the rest turned out okay.  So this was another case where 12 rivets took, oh, two hours.  I wonder if other people are this slow?  It would have been a lot longer without the heads-up from other builders and to them I am grateful.  Thanks Dave!
Tuesday, August 14, 2012

V-stab forward skin

It cooled down this evening thanks to the Delta breeze so I was able to spend time in the airplane factory to attach the forward skin to the v-stab.  Here's the "before" picture.  If you click on it you can expand the picture to see the small flush rivets for the nut plates and the dimples for the screws so that they're flush with the skin.  The screws go into nut plates behind the skin.

And here's the "after", fingerprints and all.  Once the top screws were in, the forward skin just kind of wrapped itself into place.  Once tightened down, the screws are nice and flush with the skin.
Also drilled out and replaced a couple of the rivets that didn't go in so well on Sunday.

Monday, August 13, 2012

Skinning the V-Stab

It's too hot to be in the garage, so it was time to move the project indoors, for a day anyway.  Sunday I pulled 250 pop rivets to fasten the skin onto the v-stab skeleton while catching the end of the London olympics on TV.  The closing ceremony was just interesting enough that I didn't want to miss it and just boring enough that it was good to be doing something else at the same time.

I didn't really have enough of the copper clecos so I used what I had very judiciously and moved 'em around a lot, working from the leading edge back to the main spar.  At 3 squeezes per pop-rivet, and squeezing cleco pliars two or four times for every rivet, comes out to over 1,500 hand squeezes.  Monday my hand was sore from all the riveting, but thankfully no forearm tendonitis, which I'm prone to getting.  I guess that means progress.

I have to drill out two of the rivets that didn't turn out right, and "shave" a couple others where the rivet post didn't break off where it's supposed to.  Otherwise it looks pretty good all put together.  An actual airplane part!

With the skin now fastened to the skeleton, the vertical stabilizer is remarkably strong and rigid, while also being super light.  Very cool!   Even though Van's suggests taking it off because the adhesive tends to age-harden, I'm keeping the blue film on for now to protect it from scratches.

Saturday, August 11, 2012

Dimple Die Modification

Thursday I found and replaced the run capacitor, a $20 part, so the A/C is working fine now.  In addition the drill bits and dimple die set came in, so was able to take care of Page 6-6 Steps 1 - 7, which involved slightly enlarging some holes in the skin and dimpling some others.  Step 8 was interesting as it required grinding down one side of a dimple die in order to dimple 16 nut plates before riveting them onto the V-stab skin.  Here's a picture of a 3/32" dimple die set welded to the business end of a pair of vice grips:
For making small dimples in aluminum this clever modification of regular pair of vice grips is easier than using the dimple dies with the large clumsy rivet squeezer.  Clumsy when I use it anyway.   However, because of the diameter of the die, there was an obstruction problem trying to dimple the nut plates as shown in this somewhat blurry picture [this is what things look like close-up without my reading glasses].


After getting permission from the coworker who loaned me the tools I ground off one side of the female die with the grinding wheel so that I could dimple the nut plates.

Modification complete.
And now it fits!  The nut plate dimples (and their matching dimples on the skin) will fasten together better with the small flush rivets I used earlier.
And 16 nut plates were dimpled in no time.

And now I fasten the nut plates onto the V-stab skin before riveting the skin onto the V-stab skeleton.  Here's what that looks like using the Main Squeeze rivet squeezers.

Wednesday, August 8, 2012

It's 102 and the A/C blower is out

A high pressure system sitting over Nevada that refuses to budge is causing a record run of triple digit weather in Sacramento and elsewhere in the valley.  By the weekend it's supposed to hit 107, but it's a dry heat (snerk).  Naturally this means that the blower on the HVAC system, which is located in the attic of all places, has decided that now would be a good time to quit working.  Since heat rises, the temperature up there is something like 900 degrees.  Merely peering into the attic atop a ladder in the laundry room generates a heat blast that could toast a bagel.  So I'm taking tomorrow morning off to work on the tail assembly.  Not.  I'll be crawling around in the attic, my favorite place to hang out in the summer.  I'm really hoping that's it's just the run capacitor for the blower motor; that I can find the darn thing; that I can swap it out with a new one without too much fuss; and that I can get it all buttoned up before the attic temp reaches "broil".  Otherwise the CFO and PO (precocious offspring) will make me call a pro to fix it before we all sweat to death.  I bet the HVAC repair guys love stagnant high pressure systems.